Every single website needs Google Tag Manager. Stop reading this article right now and install Google Tag Manager, or better yet, call us and we’ll help you. Here’s why.
No matter what your industry, vertical, or niche is, you probably have a website. You use this website to attract customers. You need data from this website about your customers who visit your website without becoming customers so that you can improve your website.
Enter Google Tag Manager.
Why Google Tag Manager
Google Tag Manager is the answer to just about every problem your website has with measuring action.
- Need to place Google AdWords or Facebook conversion scripts? Google Tag Manager.
- Need to see if customers watch the videos on your website? Google Tag Manager.
- Need to add event tracking to your forms? Google Tag Manager.
Google Tag Manager has many preformatted tags you can use to apply common scripts to a website via a single script. Instead of applying several individual scripts in order to capture conversions and actions on a website, one script, the Google Tag Manager script, is placed instead. GTM is then configured to apply scripts on an as-needed basis asynchronously without having to reply on web developers. Having one script that loads all the scripts your website requires? This is the single greatest reason why your website should use Google Tag Manager.
Most websites require only standard tag configurations, many of which are loaded in GTM. However, there are times when you may require advanced applications. Whatever the need, no matter how challenging it may seem, chances are Google Tag Manager can solve your measurement problem. The second greatest reason why your website should use GTM? Google Tag Manager can handle even the most challenging technical issues of your website.
Google Tag Manager in Action
Here’s an example of how we solved a recent issue a client had with capturing pageviews and conversions in the checkout process, a challenging technical issue that began with the standard GTM tags and ended with the customization required to create virtual pageviews.
Due to the nature of the client’s business, the client’s checkout process has eight steps. Ensuring that customers make it through the eight-step process is critical, so the team required accurate data collection for the entire checkout process. Standard implementation of Enhanced Ecommerce from Google Analytics would have been appropriate and Google Tag Manager rendered unnecessary, except for one glaring issue: the order confirmation URL.
In the last two of the eight steps of this client’s checkout, the same URL is used. Developers were unable to retain the original solution that distinguished the URL for the “order confirmation” page from the “place order” page.
With the standard implementation of Universal Analytics, this client was unable to measure fully the checkout process and conversions. The consequences were immediately apparent. Two pageviews fired for the “order confirmation” URL. The Checkout Behavior report reported 100% exit on the “order confirmation” page, even though transactions occurred. The client needed a solution fast.
Because this client was an early adopter of Google Tag Manager, the website already contained the GTM snippet. GTM is how this client applied Google Analytics code, Google AdWords conversion script, the Facebook pixel, and more. Unable to develop a solution to this problem, the client asked for a solution that used Google Tag Manager.
Consultation with the Google Tag Manager implementation team at Google proved unsuccessful. Unfortunately, Google’s own team lacked experience with Enhanced Ecommerce and declined our requests for assistance. Thus, I went to work to develop a solution.
With a combination of virtual pageview tags and an ecommerce tag, I was able to capture the entire checkout process. Here’s a screenshot of the virtual pageview tag I crafted for the “order confirmation” page.
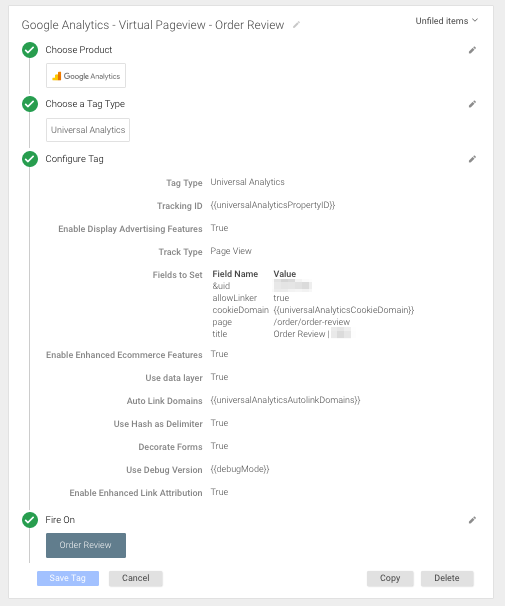
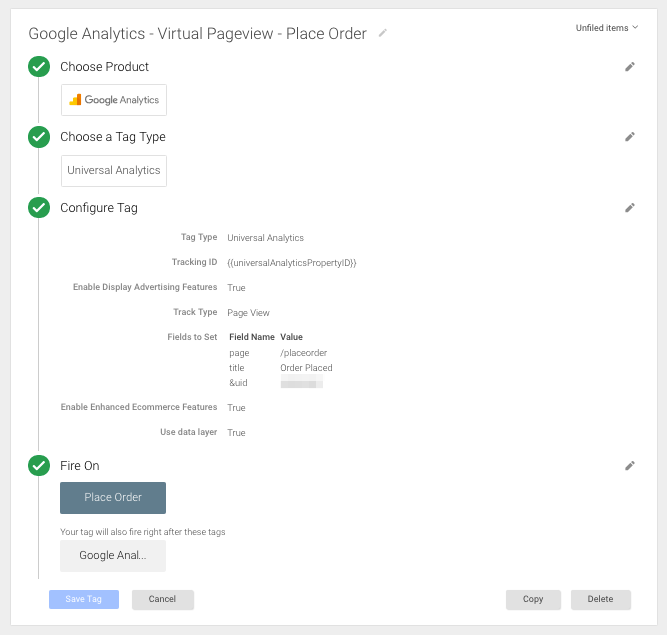
Next, I created a second virtual pageview tag that fires when someone clicks the “Place Order” button on the “order confirmation page.”
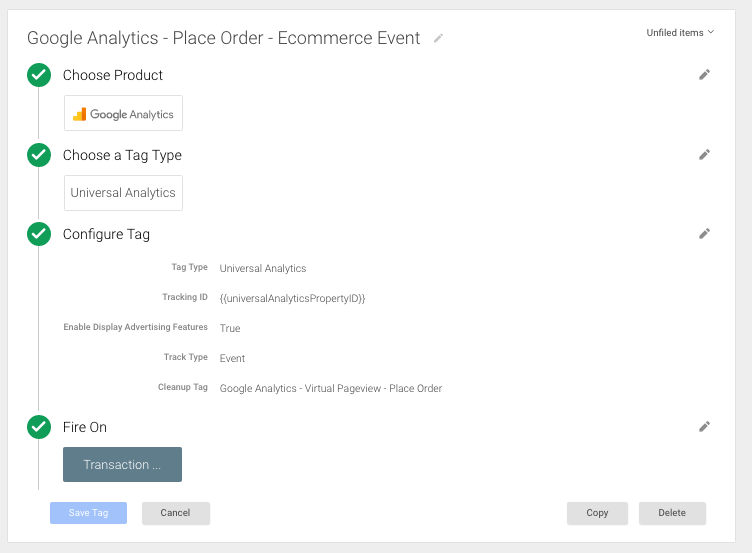
I also added a transaction tag to capture ecommerce data.
When does a website require a virtual pageview? In this example, orders processed without actually firing a pageview. However, in order to populate the Funnel Visualization report in Google Analytics, we required a pageview to fire on order completion. Thus, we crafted the aforementioned tag to fire a virtual pageview on an on-click event since pageviews, not events, can be captured in the Funnel Visualization report. Virtual pageviews make events appear as webpages to Google Analytics, offering the ability to generate additional insight and usability.
Creating Your Own
If you’re already using Google Tag Manager’s preformatted tags, but you think you could benefit for GTM, use these step-by-step instructions to create your own virtual pageview tag.
Before you begin, identify the event that occurs on your website you’d like to have appear as a webpage in Google Analytics. Typically, this is a “submit” button or something similar, usually a form of some sort. Right-click the button and identify the CSS class and ID that you’ve used to style the button. Copy the class and ID. You’ll use these for your tag later.
First, navigate to your Google Tag Manager account and configure a new Google Analytics tag.
Second, choose either Universal or Classic, depending on what you use on your website.
Third, choose “Page View” as the “Track Type.” Enter the values you wish to correspond to the “virtual page” that will be created upon click of the button you’ve selected.
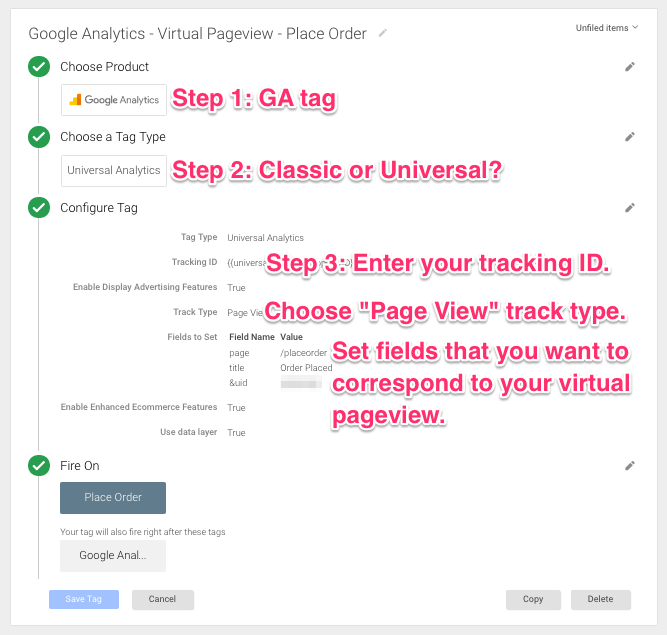
Fourth, choose the “Click” trigger. Configure this Trigger to trigger on All Elements with with the ID and class for the button you’ve chosen. Click “Create Trigger.”
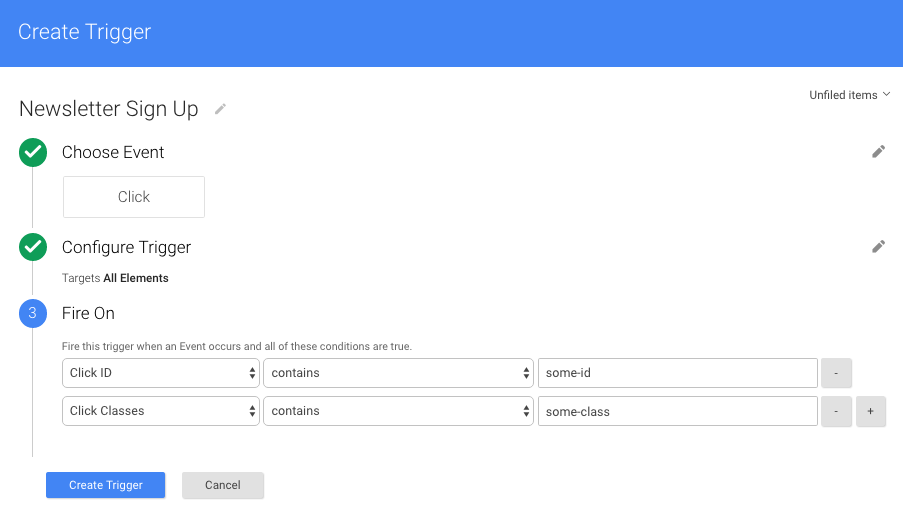
You are now ready to save your tag. Remember to debug before you publish a new version of the container!
If creating virtual pageviews is something that you need but you don’t have the time to implement, call us today and let’s discuss what we can make happen for you.
